
I Upgraded a Shopify Theme From Version 8 to 13 — Here’s Everything That Went Wrong (And How We Fixed It)
Let me be straight with you.
When we upgraded this Shopify store from theme version 8 to version 13, we did not know it would take a full day. We thought it would be a few hours. Click update, test a bit, done.
It was not done.
We lost tracking scripts. FontAwesome icons stopped rendering. Products showed “Sold out” on the preview when they were perfectly in stock on the live site. We had to rebuild section files from scratch because the schema had changed.
But we got through it. And now you do not have to go through the same thing, because this guide documents every single step, every error, and every fix.
First, Understand What a Shopify Theme Upgrade Actually Is
This is the part most tutorials skip, and it is the reason people get surprised.
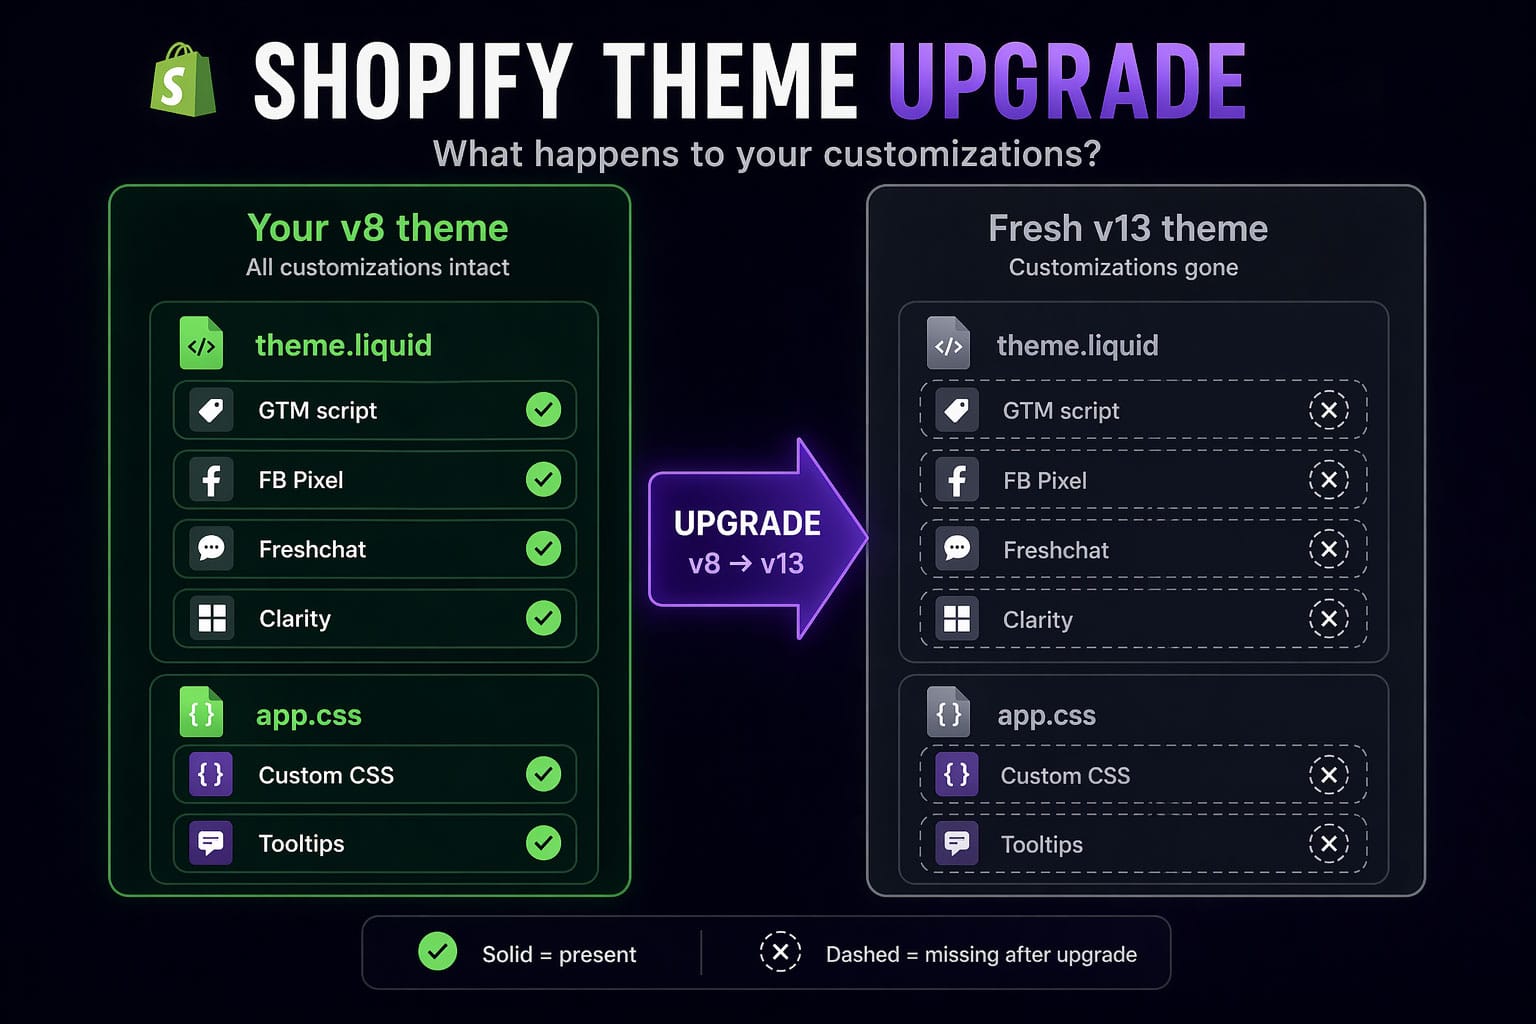
When Shopify says “a new version of your theme is available,” they are not offering you a patch or an update like on your phone. They are offering you a completely new set of files — a fresh install of the theme.
Your current theme has months or years of customizations baked into it. Tracking codes. Custom CSS. FontAwesome icons. Scripts that hide certain sections on certain pages. None of that is saved in Shopify’s settings panel. It lives in the files. And when you install the new version, those files get replaced.
Your customizations do not come along for the ride.
The Files You Need to Worry About
Not every file in your theme is customized. Most stores have changes concentrated in a handful of files.
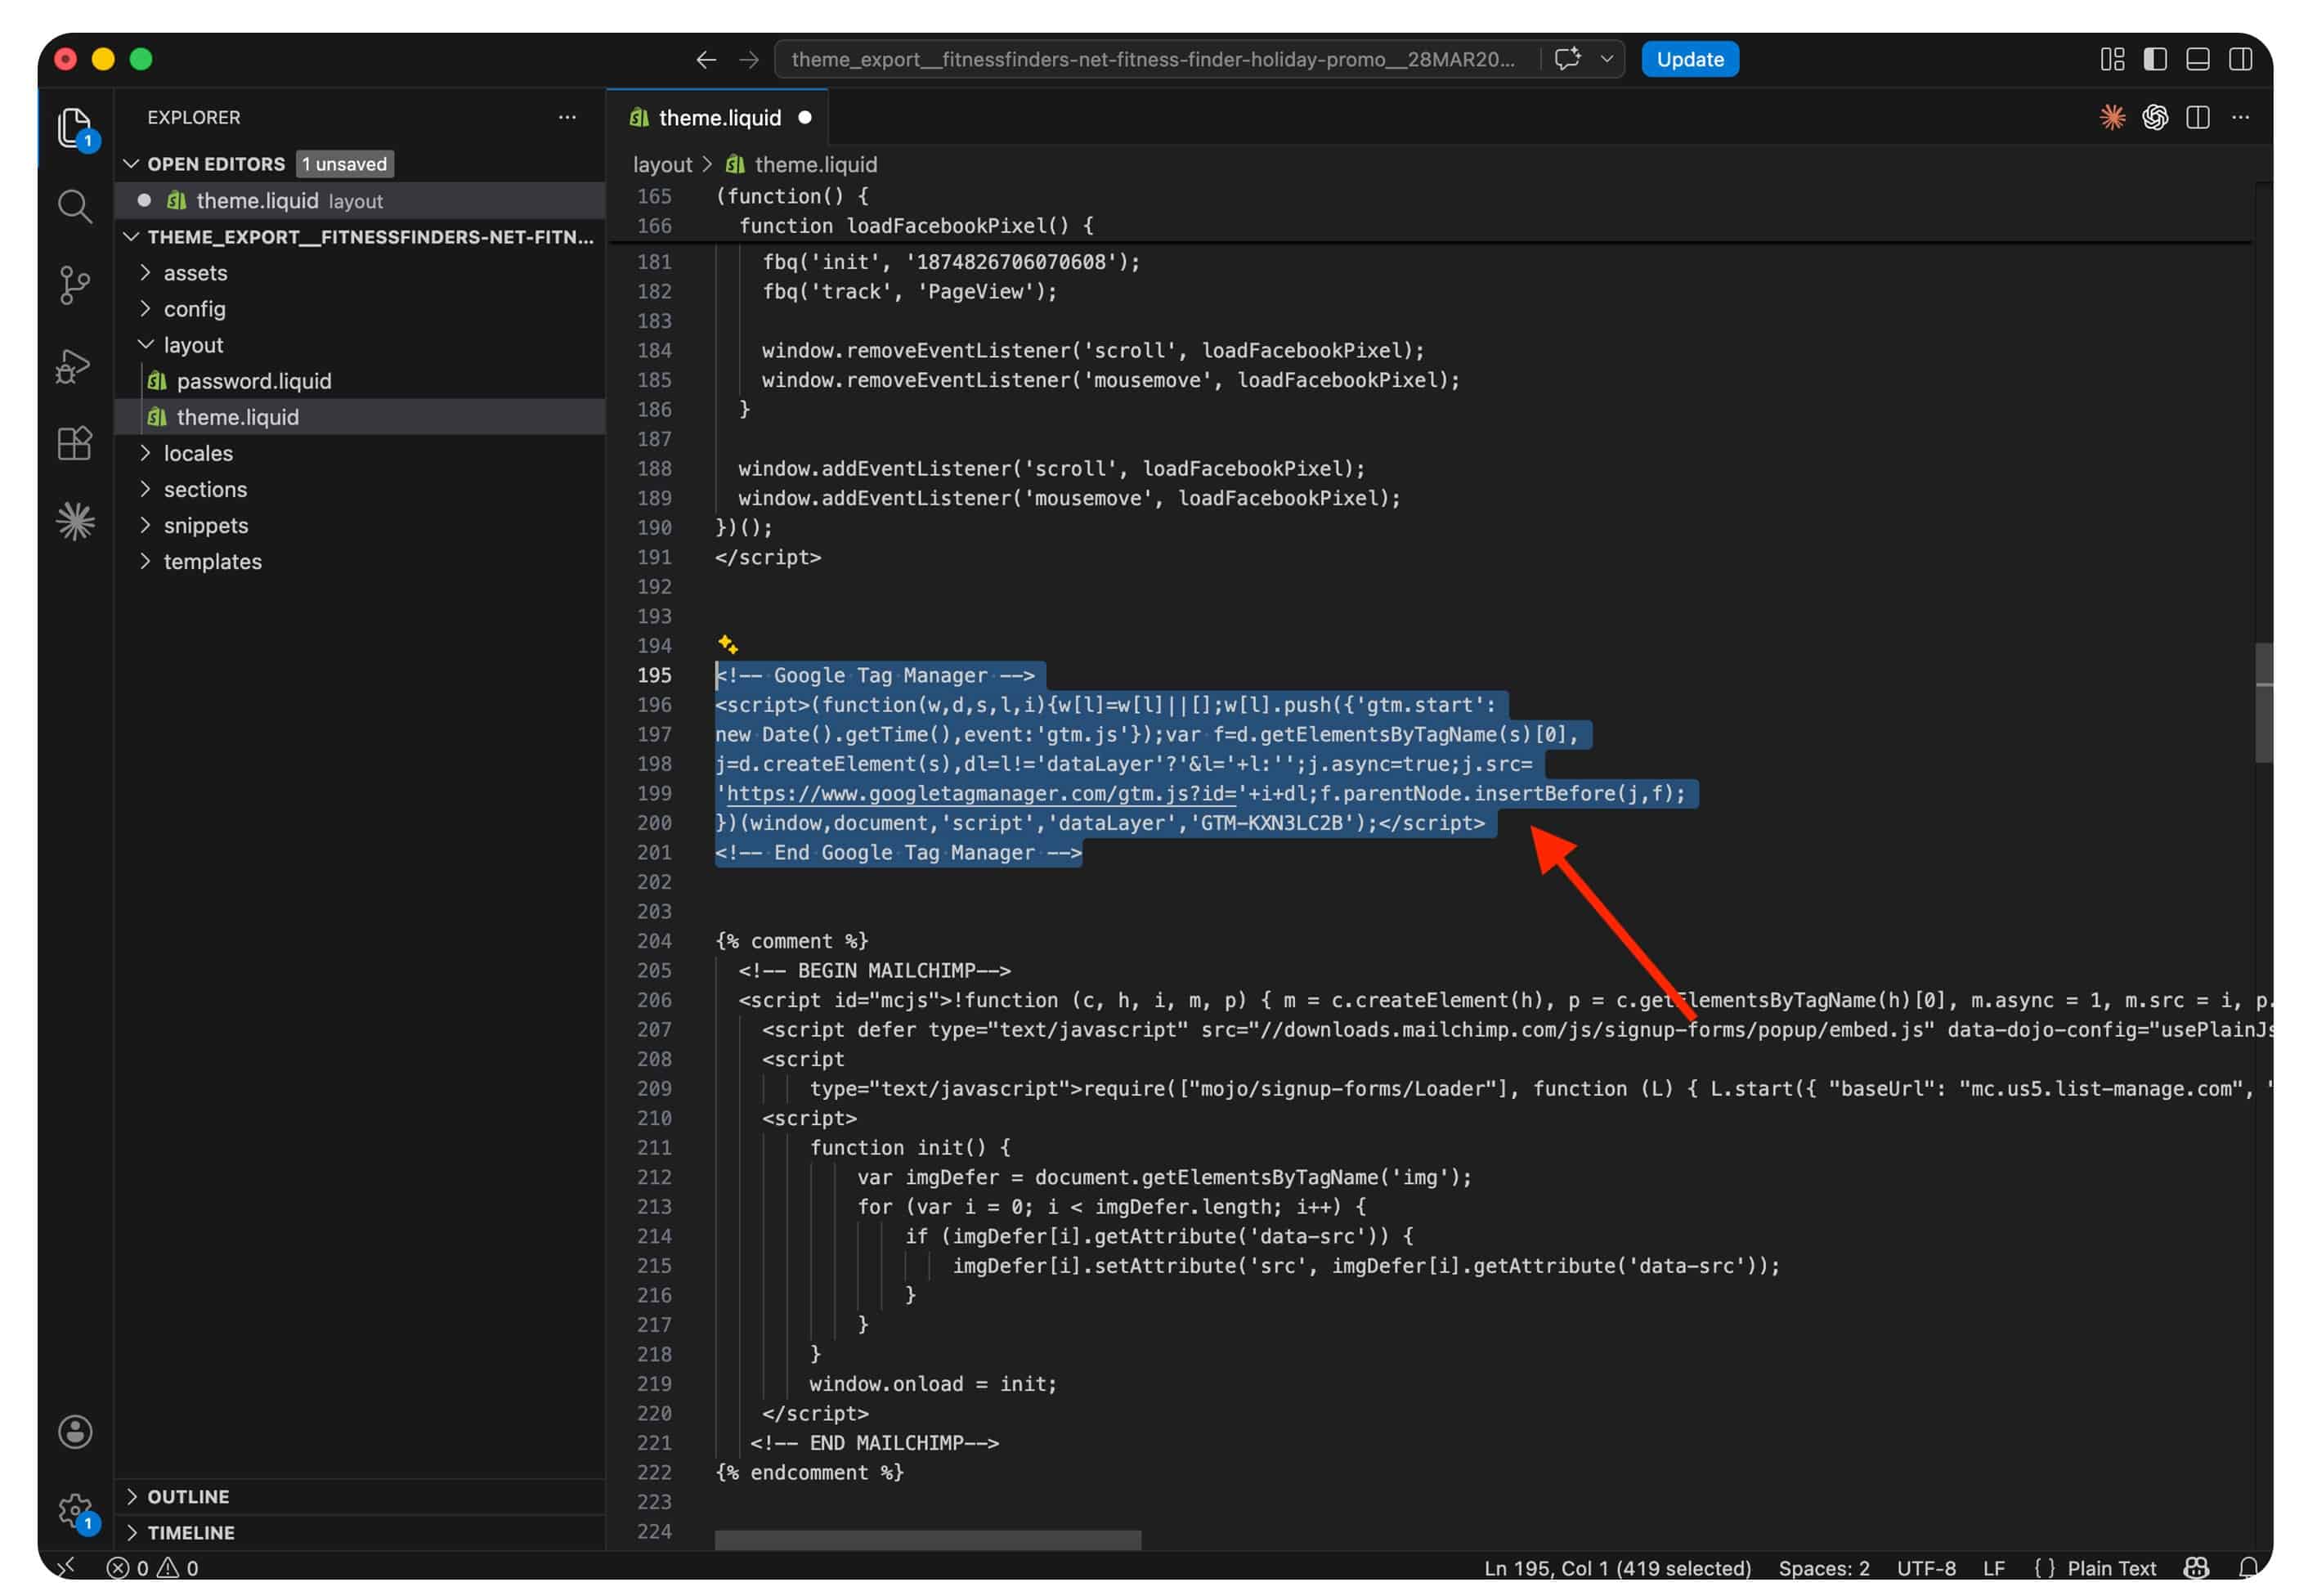
theme.liquid is usually the biggest one. This is where tracking scripts live — Google Tag Manager, Facebook Pixel, Microsoft Clarity, Heap, Ahrefs. If you added a live chat widget, an accessibility tool, or a cookie consent banner, it is probably in here too.
app.css is where all your visual customizations live. Product card tweaks, pagination styling, filter sidebar changes, review widget overrides, swatch tooltips — all of it is in this one file.
Section files like text-with-icons.liquid are where things get interesting. If you added FontAwesome support or custom color pickers to a section, the v13 version of that section does not know about any of that.
Snippets and assets — custom JavaScript files, reusable Liquid snippets, anything you created from scratch — these actually survive the upgrade because they are not part of the core theme files. But anything you added to an existing file is gone.
Step 1: Back Up Everything Before You Touch Anything
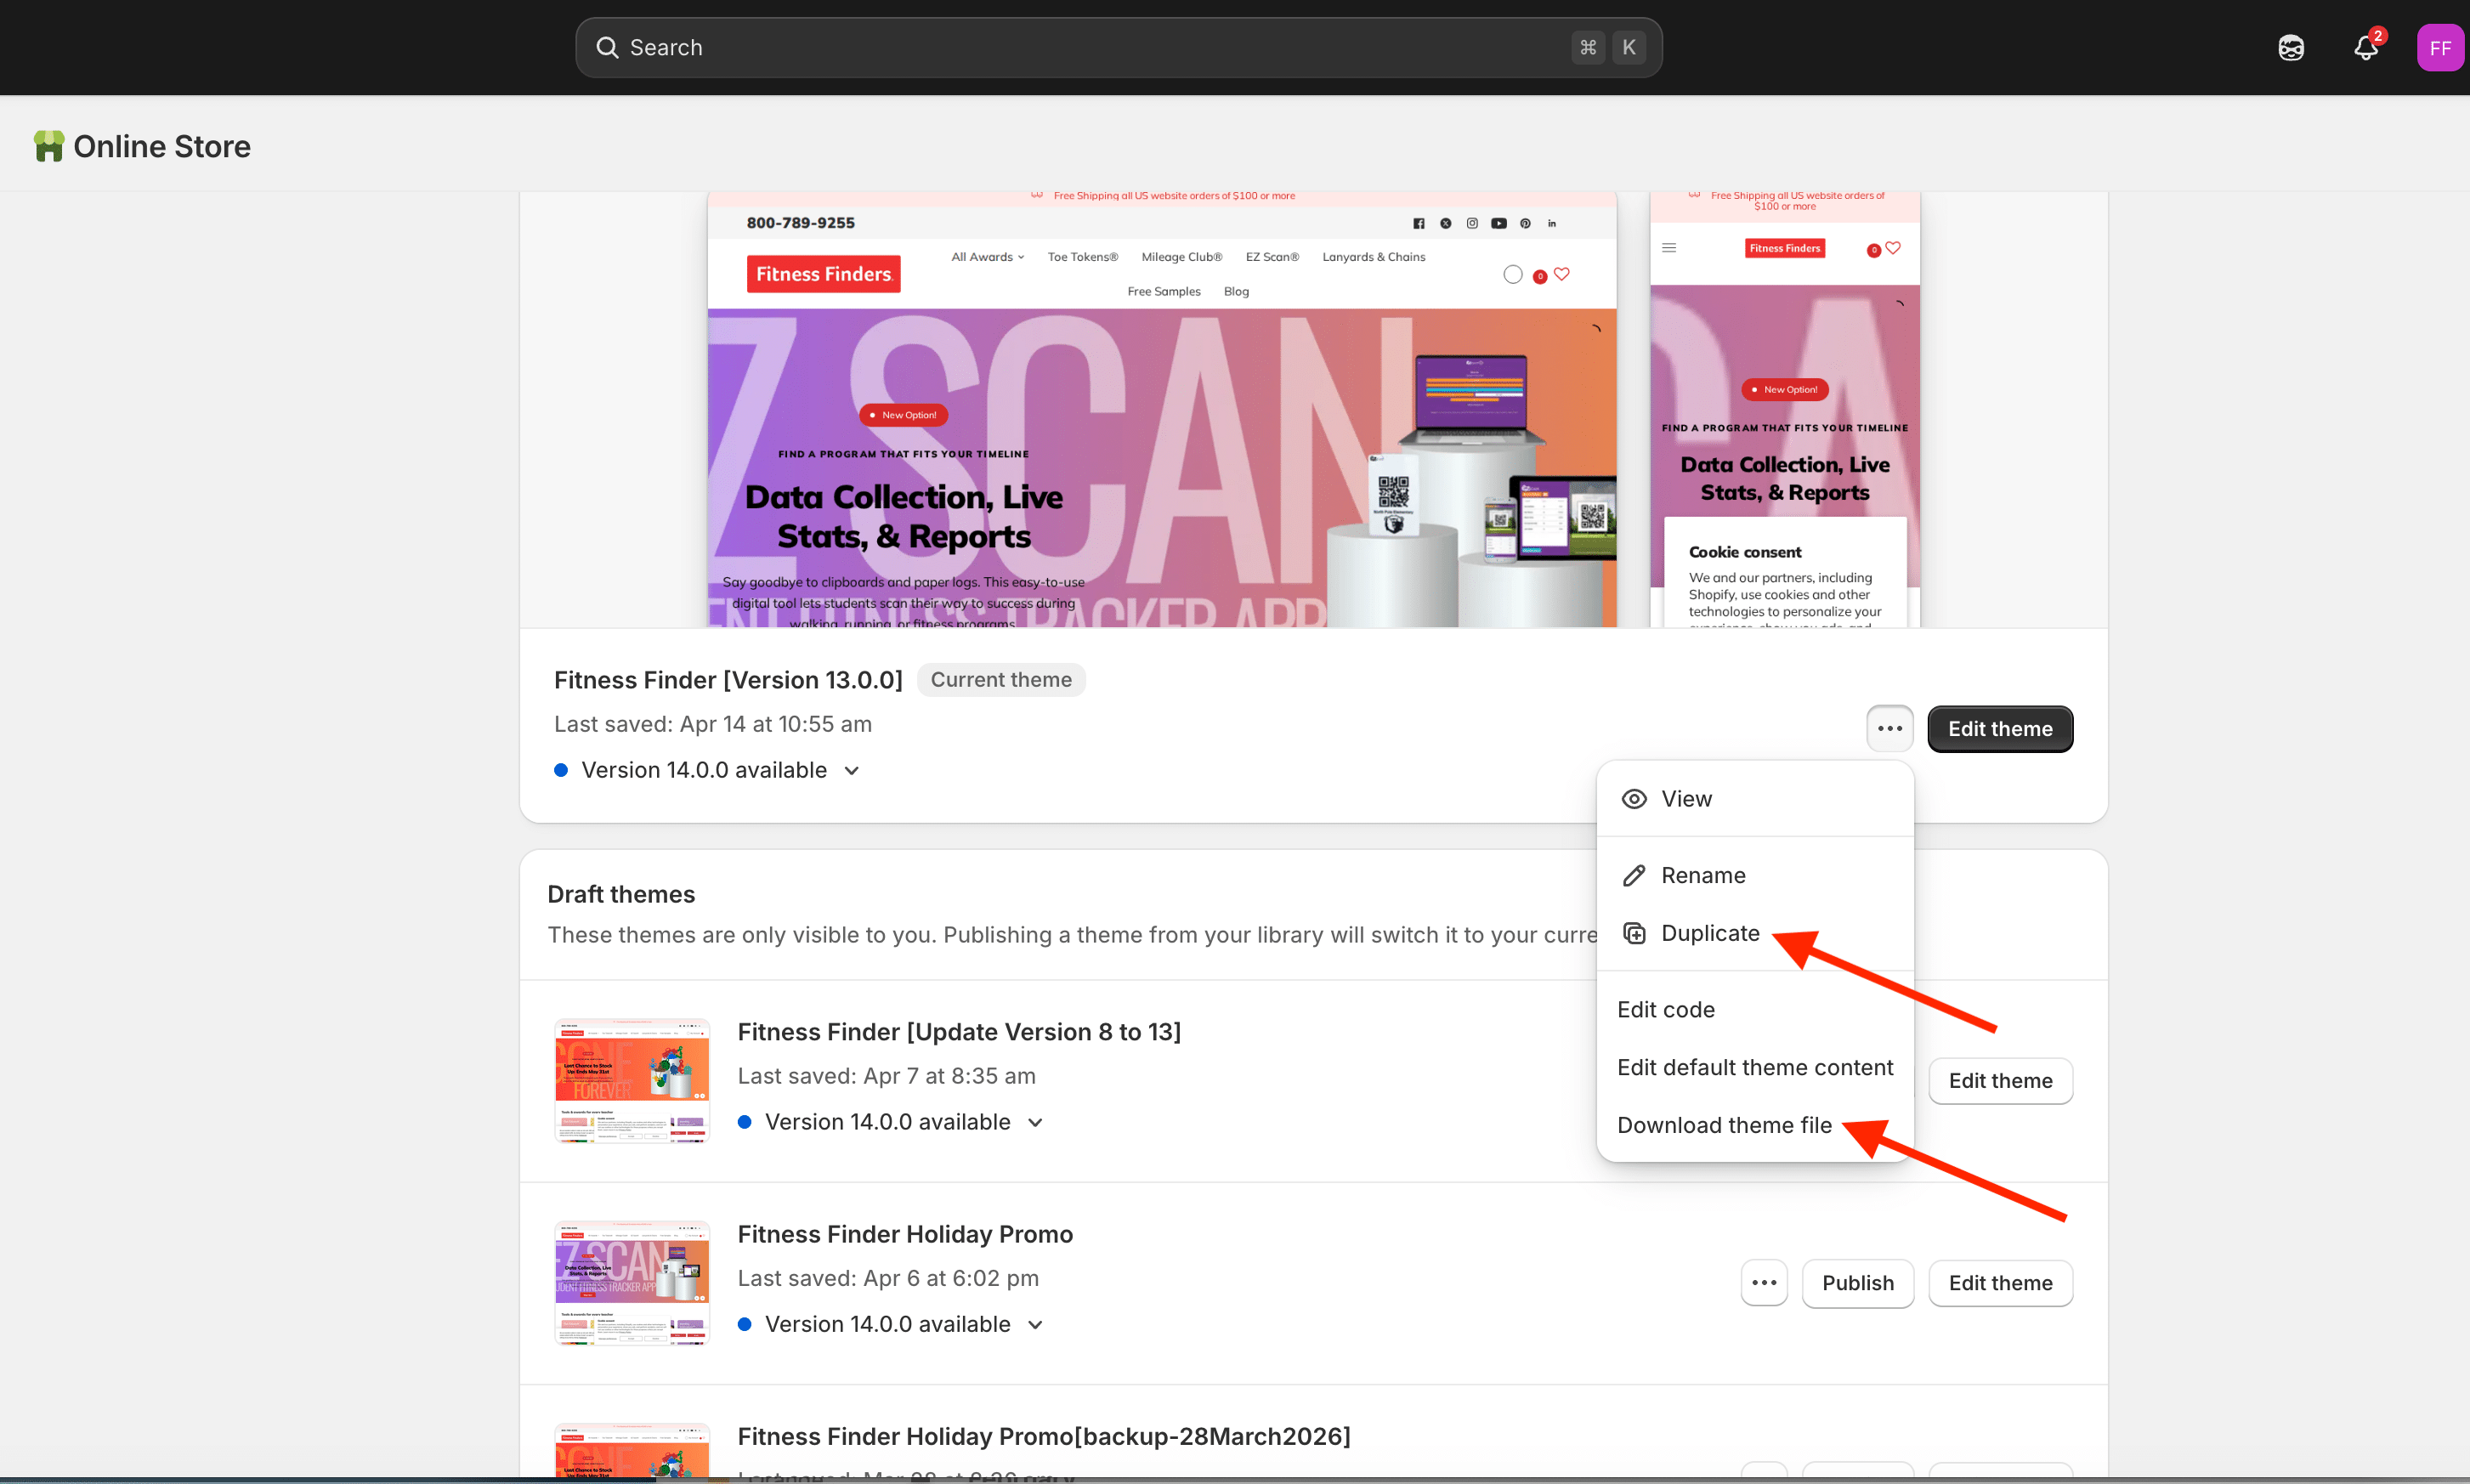
Go to Shopify Admin → Online Store → Themes. Find your live theme. Click Actions → Download. Save that ZIP file somewhere you will not accidentally delete it.
Then click Actions → Duplicate. Now you have a backup copy of your live theme sitting inside Shopify itself.
Do both. The download is your safety net if Shopify has a bad day. The duplicate is your one-click rollback if the upgrade goes sideways after you publish.
Step 2: Audit What You Have Changed
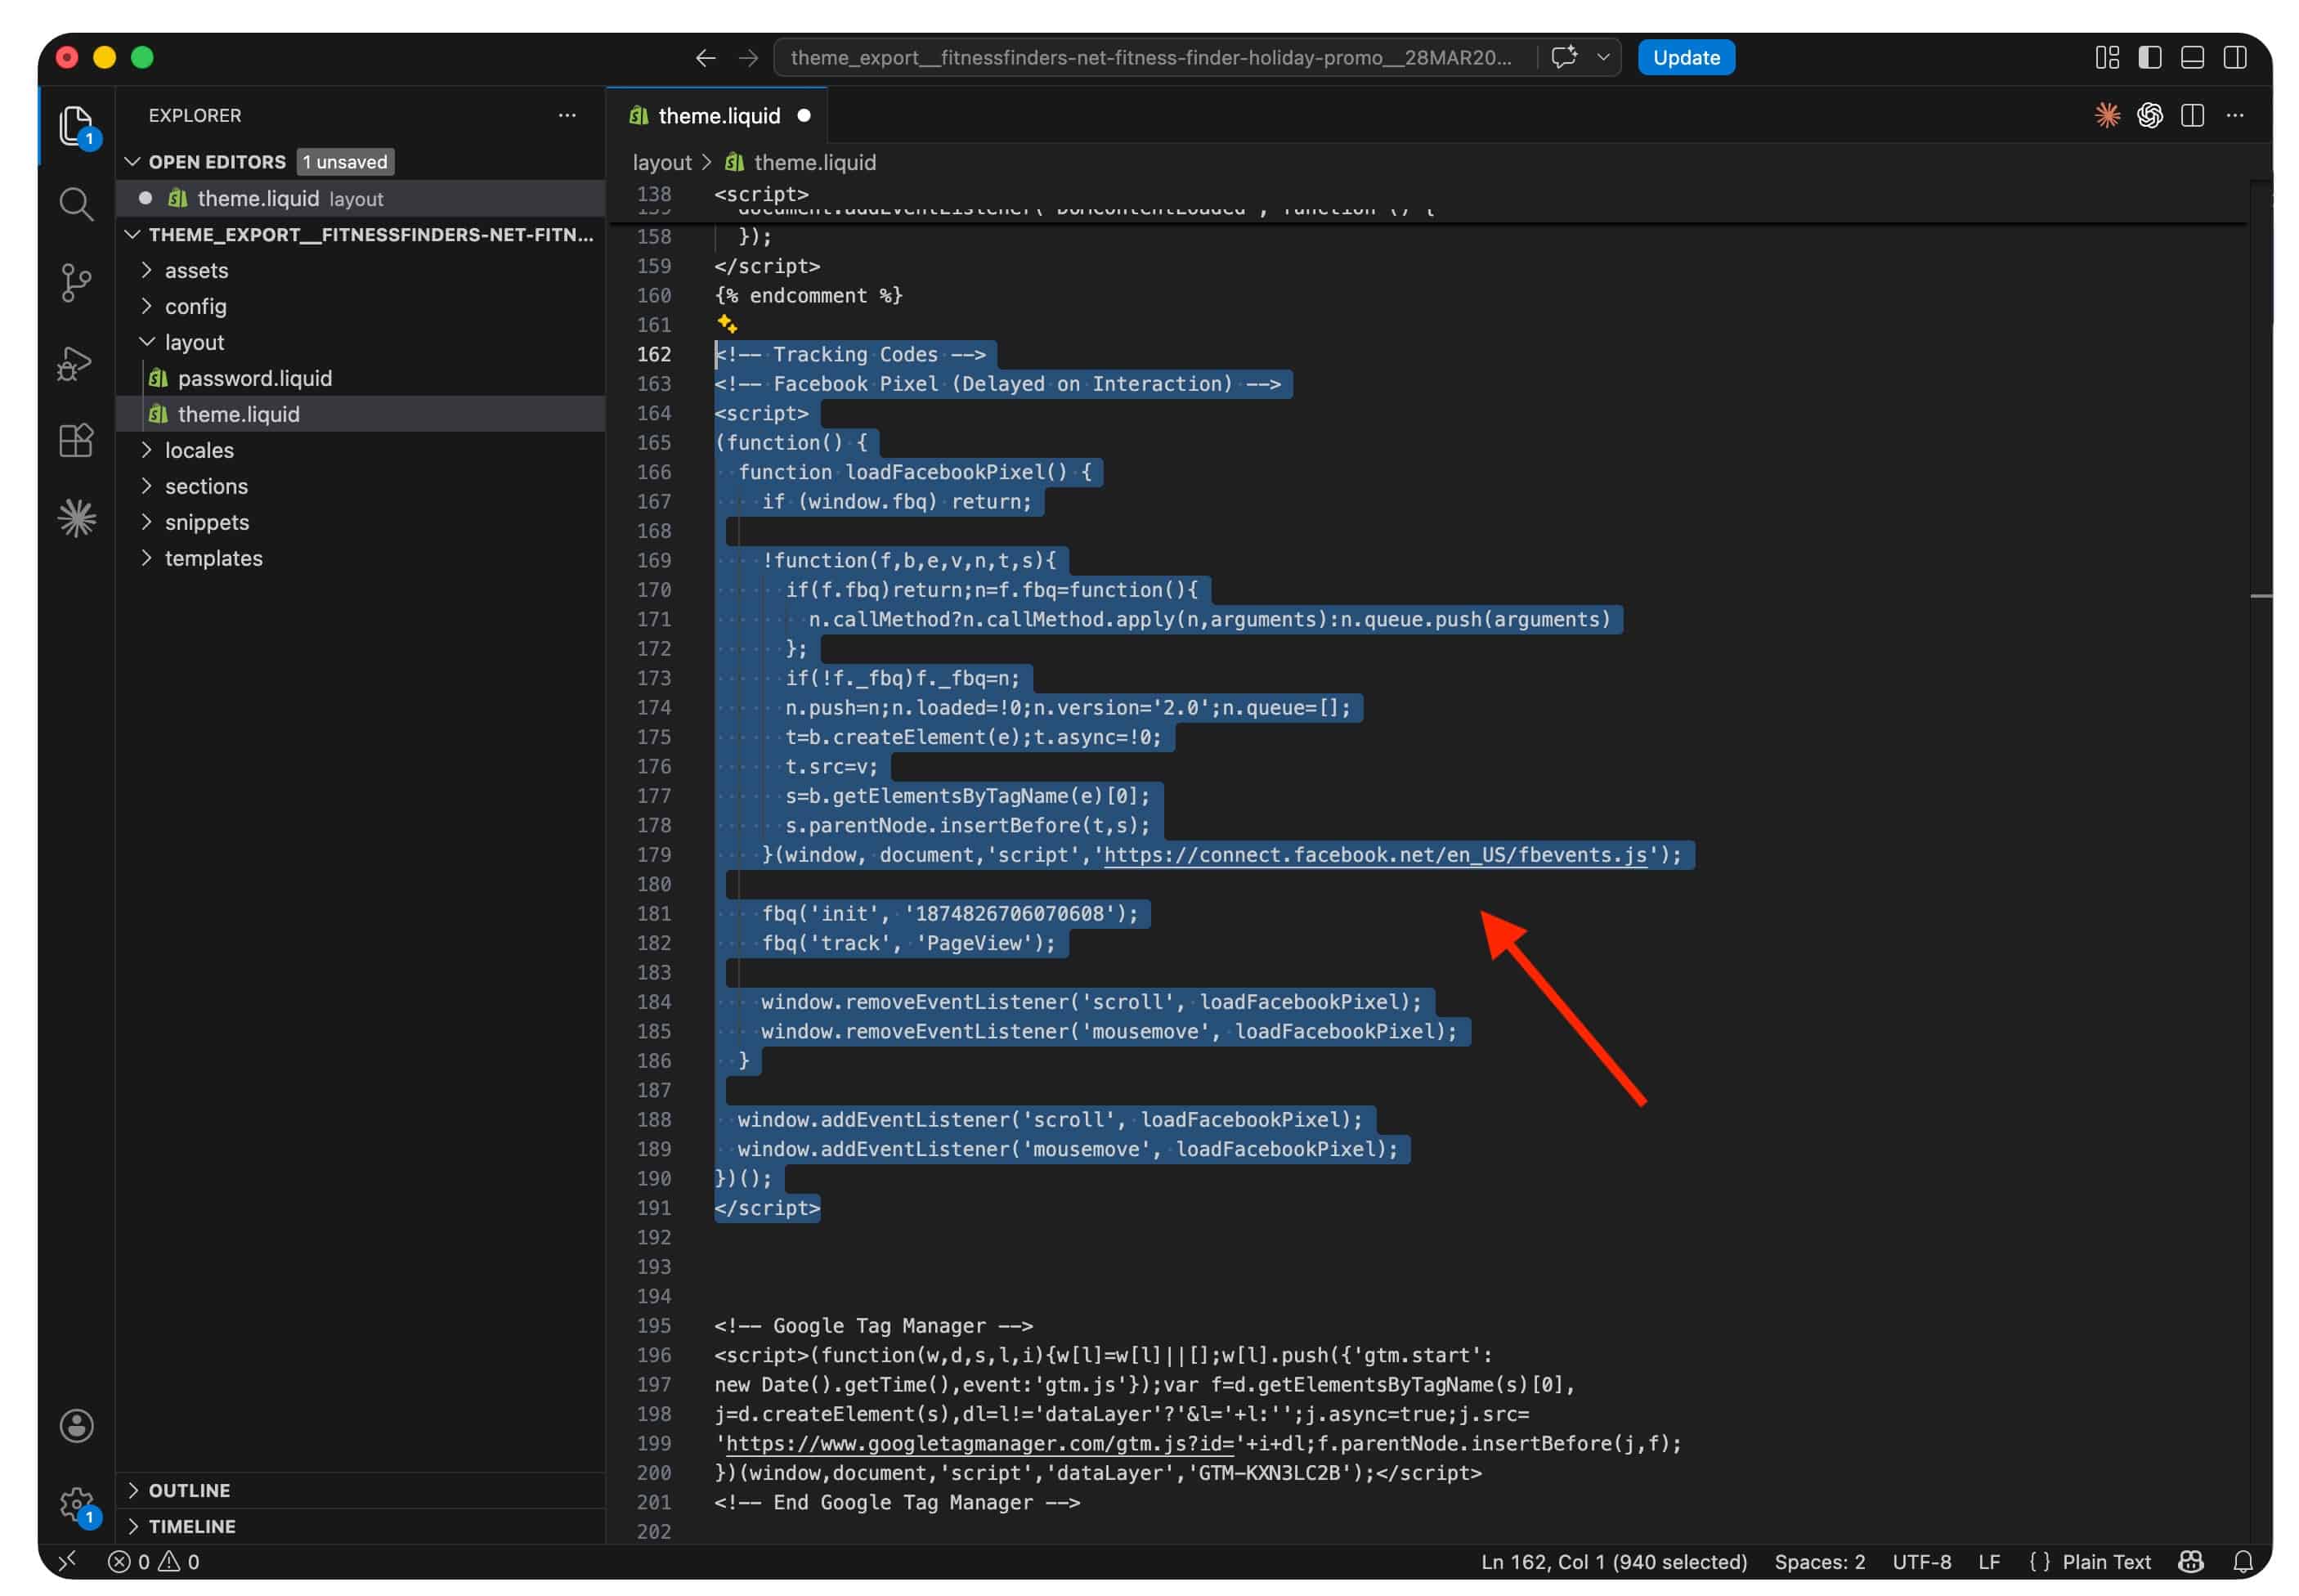
Open your downloaded theme files in VS Code. Go through each key file and note down every customization you can find.
For theme.liquid, look for anything that looks like it came from a third-party tool. Analytics scripts, widget loaders, meta tags for site verifications, custom JavaScript blocks. Write them all down.
For app.css, scroll to the bottom. Most developers add customizations at the end of the file. Look for comment headers like /* Customization */ or /* Custom */ — those mark where the base theme ends and your changes begin.
For section files, compare them mentally against what you know the section should look like. Extra schema settings, extra Liquid branches in the template — those are your additions.
Step 3: Install the New Theme Separately
Do not install the new version over your live theme. Install it as a separate, non-active theme.
In Shopify Admin → Themes → Add theme. Install v13. It shows up in your theme list but is not published. Good. Leave it there.
Now download the v13 files as well. You need both sets of files on your computer — your customized v8 and the fresh v13.
Step 4: Merge theme.liquid — The Most Important Step
Open both versions of theme.liquid side by side in VS Code. Right-click the v8 file → Select for Compare. Right-click the v13 file → Compare with Selected.
VS Code will show you exactly what changed. Green lines are new in v13. Red lines are what v13 removed.
Here is the rule: always use the v13 file as your starting point. Do not try to update v8 to look like v13. Start with v13 and add your customizations back in.
Work through it section by section:
In <head>: Add Font Awesome, your noindex meta tag, GTM snippet render, Ahrefs script and meta, navigation disable script, font weight declarations, Facebook Pixel, GTM script, Clarity, Heap, AccessiBe, Freshchat, Termly.
After <body> tag: Add the GTM noscript iframe.
Before </body>: Add Globo filter templates, hide-section script, shipping calculator, and swatch tooltips.
Keep a comment above each block — something like {% comment %} v8 CUSTOM: Facebook Pixel {% endcomment %}. When the next upgrade comes around, you will be grateful.

Step 5: Merge app.css — The Easy One
This is genuinely straightforward.
Take the entire v13 app.css. Scroll to the very bottom. Add this:
/* ============================================================
   CUSTOM STYLES — migrated from v8
   Site-specific overrides. Do not remove.
   ============================================================ */
Then paste all your v8 custom CSS below it.
That is it. CSS cascade means your rules at the bottom override anything above them. You get all the v13 improvements plus all your customizations.
One thing to check: if your v8 CSS had any rules targeting .click-capture--product, those will do nothing in v13 because that element was removed from the template. Not a breaking issue — just dead code you can clean up.
Step 6: Merge Section Files — The Tricky One
Section files have two parts: the Liquid template and the JSON schema. Both need to match v13’s structure.
We ran into this specifically with text-with-icons.liquid. In v8, we had added FontAwesome support — a text field in the schema where editors could type an FA class like fa-solid fa-star, and a Liquid branch in the template that rendered it.
V13’s version of this section had none of that.
The right way to handle it: start with the v13 section file and add only what you need from v8.
In the template, add the FA branch between the image check and the SVG fallback:
{%- elsif block.settings.fa_icon != blank and block.settings.fa_icon != 'none' -%}
    <i class="{{ block.settings.fa_icon }}"></i>
In the schema, add the fa_icon field, icon_size range slider, and icon_color picker to the block settings.
The Error We Hit
After saving, VS Code threw this:
FileSaveError: Invalid block 'icon': setting with id="fa_icon" default can't be blank
Shopify’s schema validator does not allow empty string defaults for text fields. We had set "default": "" which seemed reasonable — but Shopify rejected it.
The fix: set the default to "none" instead of empty, and update the Liquid condition to check for both blank and the string "none":
{%- elsif block.settings.fa_icon != blank and block.settings.fa_icon != 'none' -%}
Simple fix once you know what it is. Costs you twenty minutes if you do not.
Step 7: Test on the Preview — And Know What to Expect
The preview URL (the shopifypreview.com link) will show you most issues. But some issues are specific to preview mode and not actual bugs.
Products showing “Sold out” in preview but “Add to cart” on live
This happened to us. The products were perfectly in stock on the live site but showed as sold out on the preview.
The cause: we had an app that overrides the sold-out button behavior (pre-order or inventory management apps commonly do this). That app had not been enabled for the new theme yet.
Fix: go to Customize (on the new theme) in the theme editor and check that all app blocks are present in the relevant sections. Also check the app’s settings to confirm it is active for the new theme.
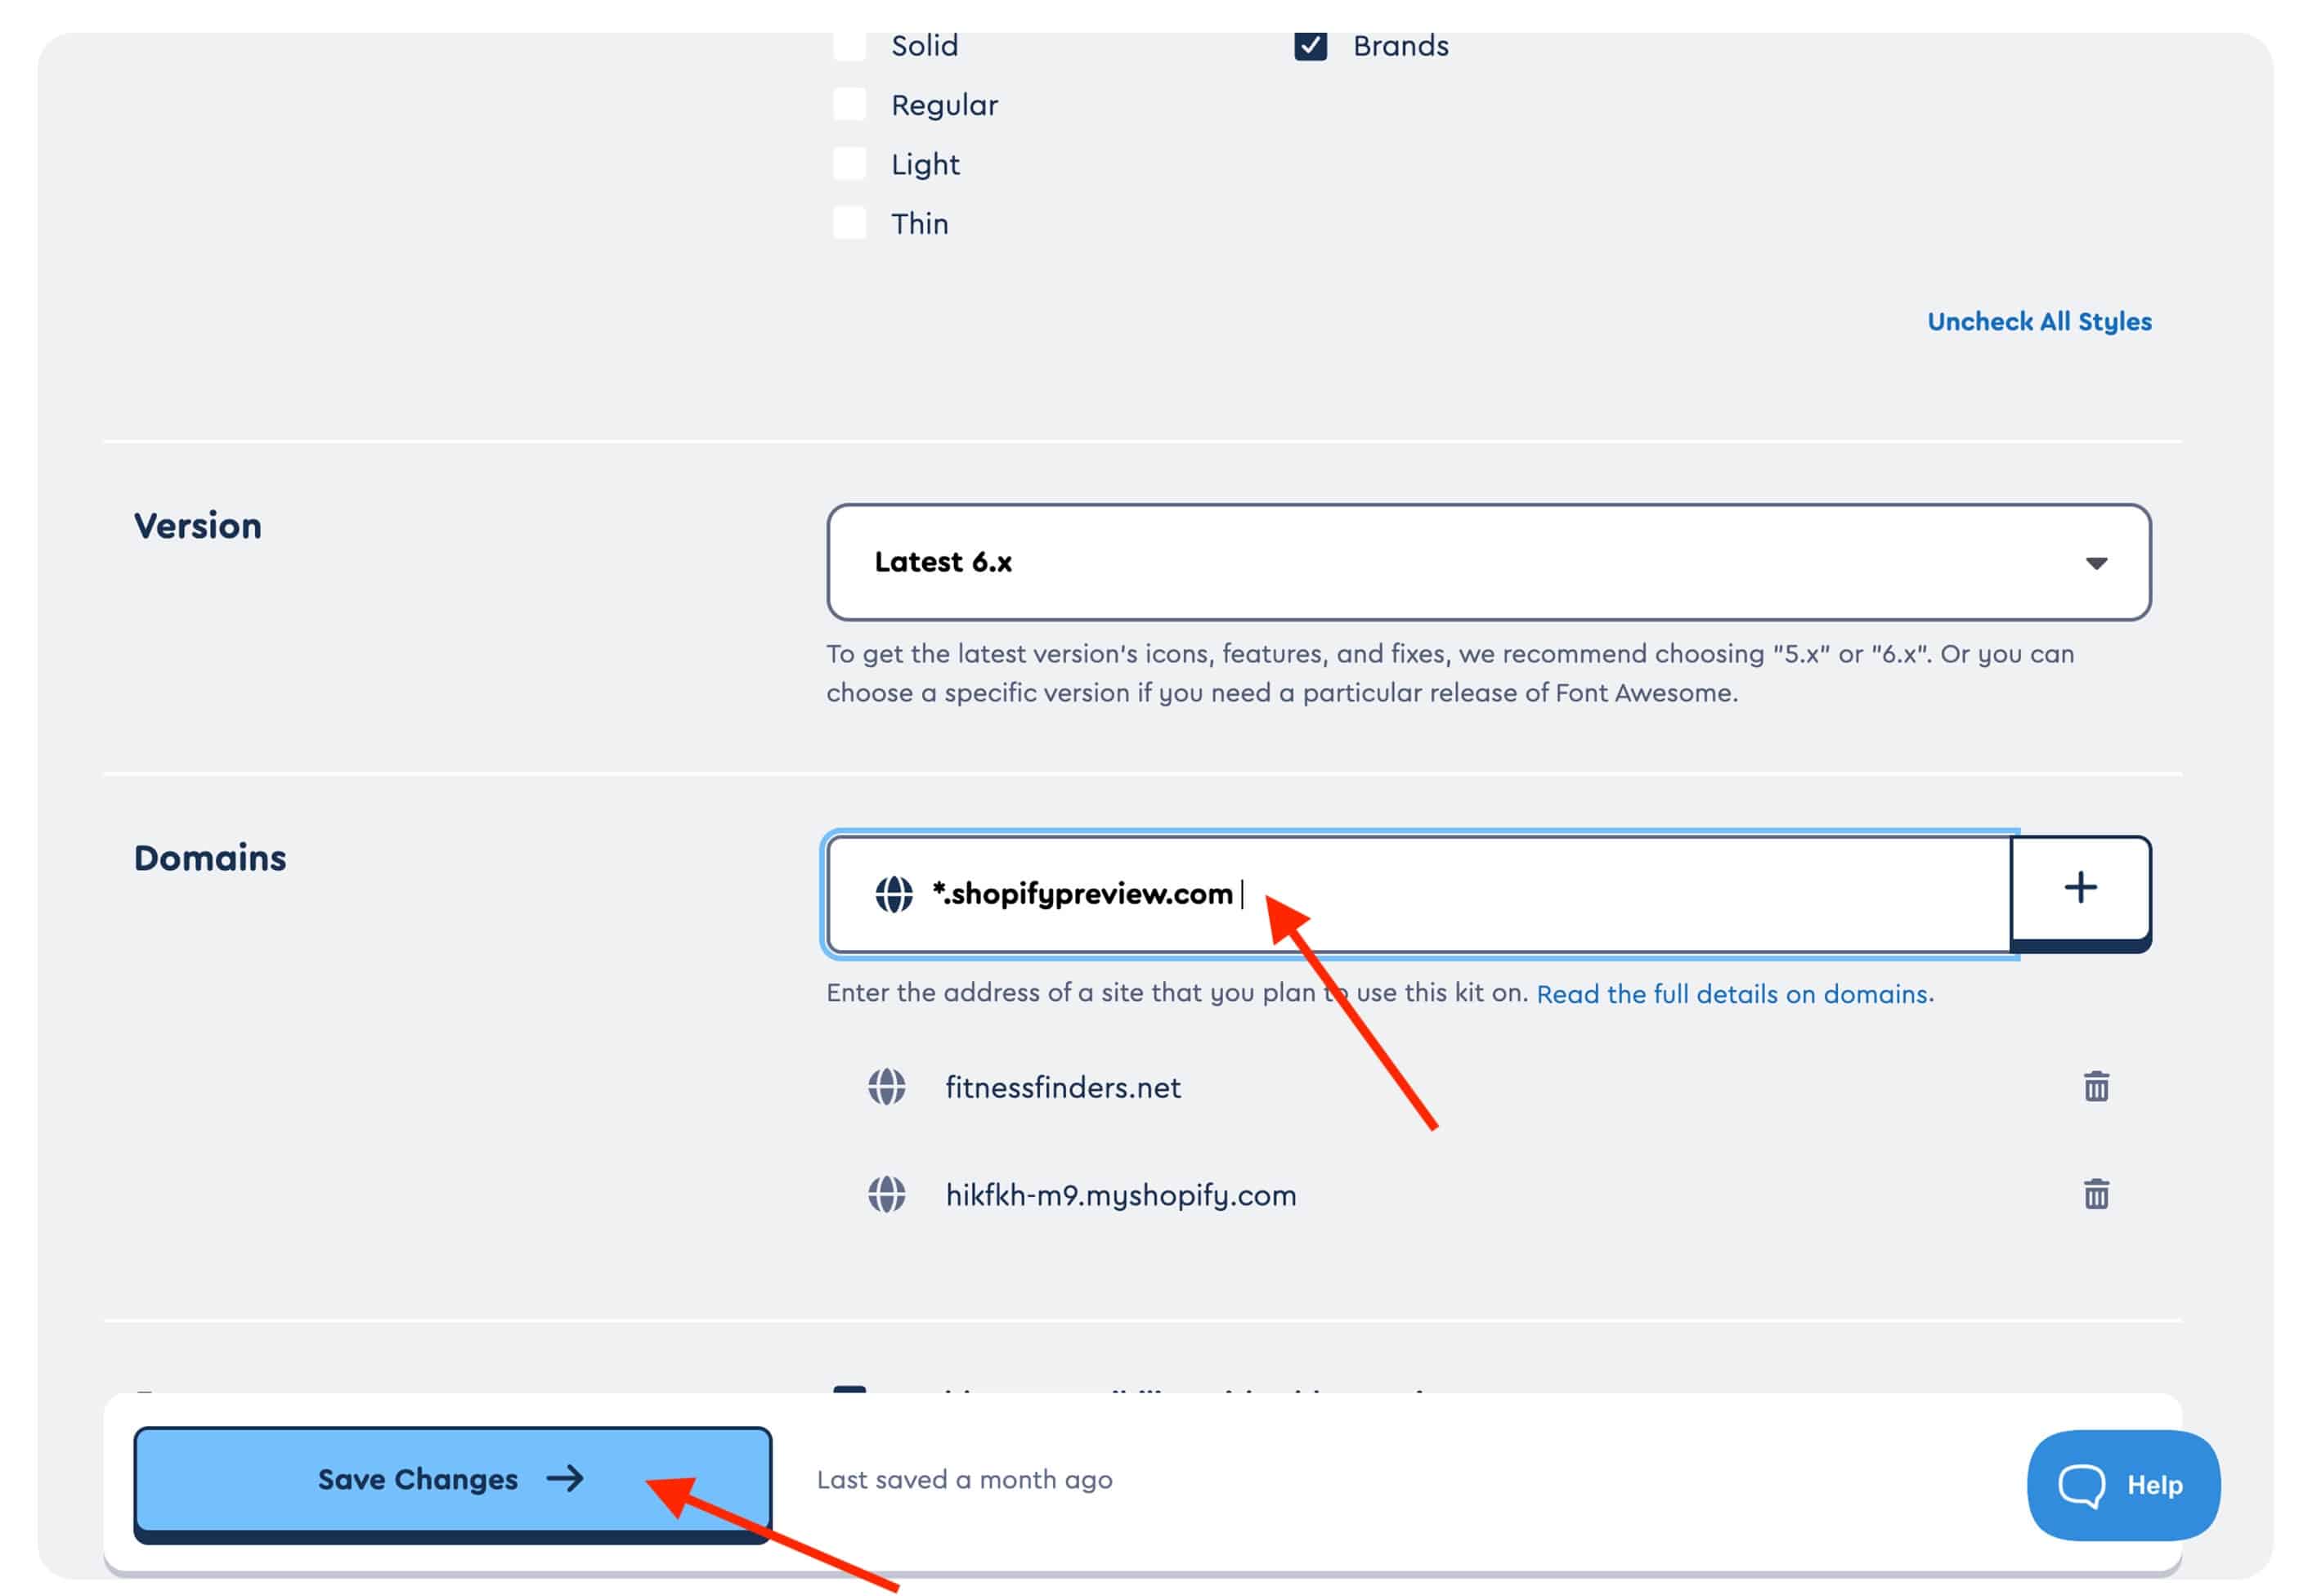
FontAwesome icons not loading in preview
This one was a FontAwesome kit settings issue, not a code issue.
FontAwesome kits have a domain allowlist. The kit was configured to load on yourstore.com but not on shopifypreview.com. Icons loaded fine on the live site but silently failed on preview.
Fix: log into fontawesome.com → Kits → your kit → Settings → add *.shopifypreview.com and *.myshopify.com to the allowed domains. Save. Refresh preview. Icons appear.
Step 8: Go Live
Run through these before you hit publish:
- GTM Preview mode confirms GTM is firing
- Meta Pixel Helper confirms Pixel fires on page load
- Clarity and Heap dashboards show new session data
- FA icons render on all pages that use them
- Swatch tooltips work on product pages and in Quick View
- Freshchat loads and the chat window opens
- AccessiBe appears everywhere except the excluded page
- Termly banner shows for a new visitor (test in incognito)
/blogs/news/posts have noindex in the page source- Collection pages show correct canonical URLs
- No console errors on homepage, collection, product, cart pages
- Mobile layout looks correct on a real phone
When everything passes, publish.
Keep the v8 theme archived. Do not delete it. If something breaks that you did not catch in testing, you can republish the old theme in about 15 seconds.
What We Would Do Differently Next Time
Create a custom.css file instead of editing app.css. If your custom styles live in a separate file you created, they survive theme upgrades automatically because they are not part of the core theme files. Just load it in theme.liquid with one line and never worry about merging CSS again.
Use App Blocks wherever possible. Most modern Shopify apps support app blocks, which inject their code without touching theme.liquid. If your chat widget, accessibility tool, or tracking app supports app blocks, use that instead of pasting scripts manually. App blocks survive upgrades automatically.
Keep a running log of every customization. A simple Notion doc or even a Google Sheet with three columns — File, What was changed, Why — turns a 2-hour audit into a 15-minute review. Update it every time you touch a theme file.
Test the preview on a real device, not just a browser. Some layout issues only appear on actual mobile hardware. Spend 5 minutes on a phone before you go live.
The Bottom Line
A Shopify theme upgrade is not difficult. It is just disciplined. The stores that run into serious trouble are the ones that click update without any preparation and then spend three days figuring out what broke.
If you back up first, audit what you have, merge carefully using the new version as your base, and test before you go live — the whole thing is manageable. Even for a heavily customized store.
We did it. You can too.
Questions about your specific upgrade? just email us.